Use eyeCU to communicate with friends and loved ones anywhere in the world
Video installation instructions
Initial Startup
At startup, the software will require the user to create an account. To do this, one must open up the ”Main Menu” – the coloured star

in the upper panel.

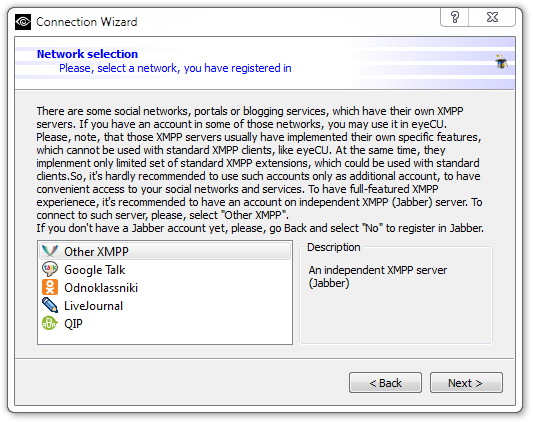
Locate the “Add Account” feature in the pop-up menu (Add account) and open up the respective manager (Wizard).

Or (Option 2) After opening up the menu, open up the settings menu (Options). Go to the accounts "Аккаунты" panel and manually create an account, through filling the blanks, which will appear upon pressing the “Add” button.

Fill in the respective forms to create an account:

Fill in «Account Name» - Examples: “Primary” or “Used”.
Fill in «Jabber ID» - your registered Jabber ID (Example: fantom@isgeek.info).
Host (Examples: Home, Office, Tablet...).
Fill in «Password» - Your Jabber password..
It is possible to register on the server with the use of this client, if allowed by the server.
In order to do this you will needм to fill in the «Account» and «Password», check the «Register Account on Server» box and click «Ok».
Afterwards you will need to follow as instructed by the server.
If the Jabber server uses SRV notes, you will need to type the host’s name or address (Example: GTalk account is represented by talk.google.com).
If you are using a proxy server, you will need to type in its type and parameters in the “Proxy” submenu.
Check the “Autconnect upon startup” box, if you wish to automatically connect upon startup.
In order to automatically reconnect to the server upon sudden disconnection, Check the “Automatically restore connection” box. Note:If you change account settings while connected to the server, you need to reconnect to apply them.
Network Login
Hover mouse over your slot in the account list (roster). This is the black field on the picture. Click with the right mouse button to open up the «status»(status). Hit «online» in the submenu (online). This should establish a connection with the server.

After a successful connection status asterisk (in line "MyAccount") turns yellow.
Adding Contacts
In order to add a new contact one must be in “online” mode, and click their profile with the right mouse button. In the submenu, click – "Add Contact".

This will open up a new menu with blanks.

In the «Contact» field, - type in the user’s account, e.g. romeo@verona.it.
The "Nickname" field will set what the user’s name will be in your contact list.
After clicking "OK", a contact request will be sent to the specified user.
If the user accepts the request, you will be able to communicate and see each other on the map.
How is it possible to stylise messages?
As of right now, the client supports two themes - Simple and Adium. The first uses simplified HTML and does not support animated emotes, although is much less memory-consuming.
Adium allows full HTML and JavaSсript support for message display, supports animated emotes, but is more expensive on the memory. .
You can find more Adium styles
here. To install a theme simply install the theme catalog (Usually located in the core of the downloaded archive and ends with .AdiumMessageStyle) into the /adiummessagestyles folder.
Before installing the theme you can select what type of messages it will apply to (As of right now theme changes can affect conversations and conferences), then choose the type of theme and which theme to use.
Each theme has the following respective parameters:
Option - The different variants of the theme, usually with different colors and arrangements.
Font - The theme’s primary font.
Background color - The theme’s background color, although not all themes allow to change this.
Background image - The theme’s background image, which will be shown under the message. Not supported by all themes.
After changing the theme, all the messages its type refers to will be deleted and readded. The message information will be taken from the archive, therefore unarchived messages will be deleted.
Please remember that not all themes are compatible with conferences.

Manually Setting up Coordinates
In order to manually set up your location, click on the desired location on the map with the right mouse button, and open up the submenu. Click on the line with the compass saying "I’m Here”. After this, these coordinates will be sent over to other contacts.

Map Search
Open up the search menu. This can be one by clicking the pop-up menu in the line above the roster

or the context menu right above the map (Click the right mouse button while holding the cursor above the map).

Choose the search service in the menu, type in the search criteria and hit "search".

If found, the search results should appear in the window. Double clicking the icon will bring the user to its location on the map.
Adding an «ICQ» transport
Although there are many transports, the one we use is ”icq.jabbers.org.ru".
Hover the mouse on the top line of the roster (contact list) - your contact name. Open up the context menu.
Choose the line "Overview of services".
In the service browser, fill the «element» box with the transport to "ICQ" (icq.jabbers.org.ru), and hit "Enter". A connection to the transport should now be established.

Hit – «Registration» in the left of the gray box and type in your ICQ username and password. Hit "Ok".

In the "settings" menu choose the "Contact List" section and hit the checkbox - "Automatically accept authorization requests" while authorisation occurs.
Switching between transports
If you need to switch between transports, this can be done easily in automatic mode. The client will delete the previous authorisation form and open up the new one. After a successful registration all your contacts will be transferred, along with your subscriptions and message history.


 in the upper panel.


